What are we going to build?
We are going to create a simple app to demonstrate how to display a list of items in Flutter.
What would you have by the end of the lesson/video/article:
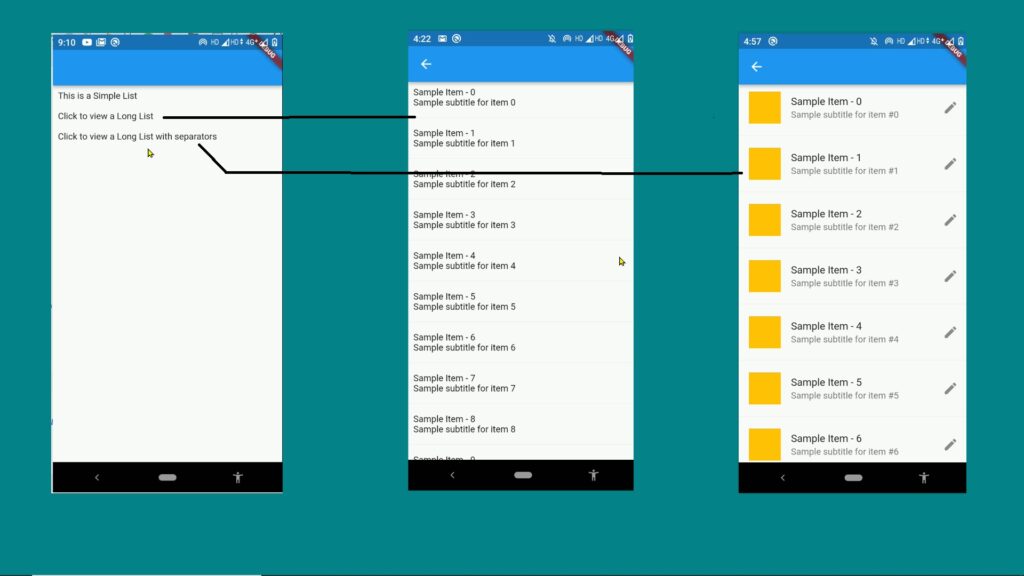
A simple app with three screens. The home screen will have three texts on a simple list. On clicking the second text item of the list we shall load the second screen displaying a long list of items. On clicking the third text of the list of the home page we shall load a list with separators in between the items.
What shall we learn?
- How display a simple list of a small number of items using the ListView of Flutter.
- How display a long list of items using the ListView of Flutter [ListView.builder()].
- How to display a list with separators/dividers between the items using the ListView of Flutter [ListView.separated()].
- How to display a horizontal list using the ListView in Flutter
- Creating a layout with a leading widget and a trailing icon for the individual list items using a ListTile.
Steps to experience:
- Create a new Flutter project
- Remove the home page widget of the default code
- Simplete List:
- Create a new widget for the home page , lets name it SimpleList
- Return a Scaffold from the build function of the new widget SimpleList
- Add an AppBar too, if you wish
- Add an instance of the widget ListView to the body of the Scaffold.
- Add three Text widgets to the property children of the ListView
- Wrap these Text widgets by the GestureDetector widget to make them Clickable
- Long list: Create a new file named long_list.dart, and inside create a new Stateless widget LongList
- Load this widget on clicking the second item of the list on home page.
- First create a long list of dummy content.
- Now return a Scaffold from the build function, also add an AppBar
- Add a ListView to the body of the Scaffold, but this time create the instance using the builder constructor instead of the
default one. - Pass the number of items of the list to the property itemCount
- Implement the itemBuilder function to create the layout for each item of the list.
- Horizontal list: Create a horizontal list
- List with separators: Create another file named list_with_divider.dart, and create a new statelesswidget inside.
- Load this widget on clicking the second item of the list on home page.
- First create a long list of dummy content.
- Now return a Scaffold from the build function, also add an AppBar .
- Add a ListView to the body of the Scaffold, but this time create the instance using the constructor named separated, neither the
default one, nor the one named builder.
- It is similar to the approach using the builder() constructor, the difference is here we have to provide implementations for two builder function
- One for the list items.
- and another for the separator between the list items.
- ListTile: Use the ListTile widget to create the layout for the idividual items of the list.
- title: Pass a Text widget to the property title.
- subtitle: Pass a Text widget to the property subtitle.
- leading: Pass an Image to the property leading.
Detailed steps:
1. Create a new Flutter project
2. Remove the home page widget of the default code
3. Simple List:
Create a new file named simple_list.dart inside the lib folder.
Inside this file create a new stateless widget for the home page , lets name it SimpleList. We have to import the material.dart library to be able to access these classes.
So take the cursor to the name of a missing class , hit Alt+Enter and from the popup select the option to import the package material.dart.
import 'package:flutter/material.dart';

class SimpleList extends StatelessWidget {
  ...
}
Return a Scaffold from the build function of the new widget SimpleList.
Add an AppBar too, if you wish.
import 'package:flutter/material.dart';

class SimpleList extends StatelessWidget {
  const SimpleList({Key? key}) : super(key: key);

  @override
  Widget build(BuildContext context) {
    return Scaffold(
      appBar: AppBar(),
      );
    }
}
Add an instance of the widget ListView to the body of the Scaffold.
Add three Text widgets to the property children of the ListView. Wrap these Text widgets by the GestureDetector widget to make them clickable.
import 'package:flutter/material.dart';

class SimpleList extends StatelessWidget {
  const SimpleList({Key? key}) : super(key: key);

  @override
  Widget build(BuildContext context) {
    return Scaffold(
      appBar: AppBar(),
      body: ListView(
        children: [
          Text('This is a Simple List'),
          GestureDetector(
              onTap: (){},
              child: Text('Click to view a Long List')),
          GestureDetector(
              onTap: (){},
              child: Text('Click to view a Long List with separators')),
        ],
      ),
    );
  }
}
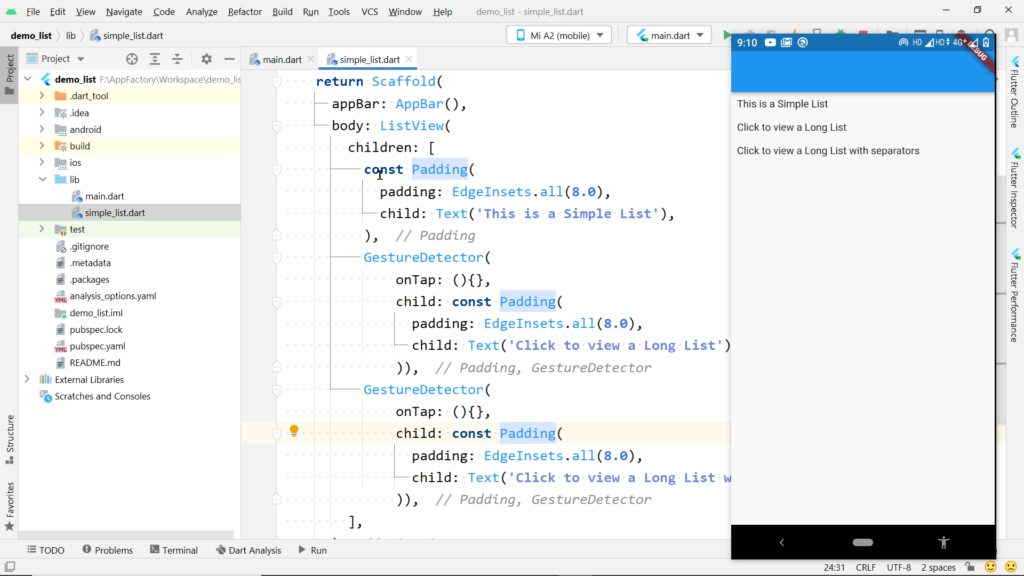
4. Long list:
Create a new file named long_list.dart, and inside create a new Stateless widget LongList , type stless and hit Ctrl+Space and select the option stless, then enter a name for the widget, let’s name it LongList.
We have some errors as these classes belong to the package material.dart and we haven’t yet imported it. So import the package material.dart now. Take the cursor to one of the missing classes and hit Alt+Enter, select material.dart from the pop-up.
import 'package:flutter/material.dart';

class LongList extends StatelessWidget {
  ...
}
Now load this widget on clicking the second item of the list of the SimpleList widget. Open the file simple_list.dart.Load this widget on clicking the second item of the list on the home page.
Call Navigator.of(), pass the context, call push() on the result.
We have to create a route for the widget to load and pass it to push(). So create an instance of MaterialPageRoute, pass an implementation of the builder function to the property builder of MaterialPageRoute. This function is called by the framework and an instance of context is passed to it on calling, so add a parameter of type BuildContext. And the widget we want to load has to be returned from this builder function.
....
GestureDetector(
  onTap: (){
    Navigator.of(context).push(MaterialPageRoute(builder: (BuildContext context)=>LongList()));
  },
  child: const Padding(
    padding: EdgeInsets.all(8.0),
    child: Text('Tap to view a long list'),
  ),
),
...
Save the changes and try clicking on this item on the list. We can see the blank screen of the widget LongList. Now let’s go back to the file long_list.dart and try to display a long list of items.
First, create a long list of dummy content.
import 'package:flutter/material.dart';

class LongList extends StatelessWidget {
  List listOfItems=List.generate(20, (index) => 'Sample Item - $index');
  LongList({Key? key}) : super(key: key);

  @override
  Widget build(BuildContext context) {
    }
}
Now return a Scaffold from the build function, also add an AppBar
Add a ListView to the body of the Scaffold, but this time create the instance using the builder constructor instead of the default one.
class LongList extends StatelessWidget {

  List listOfItems=List.generate(20, (index) => 'Sample Item - $index');
  LongList({Key? key}) : super(key: key);

  @override
  Widget build(BuildContext context) {
    return Scaffold(
      appBar: AppBar(),
      body: ListView.builder(
              ),
      );
    }
}
There are two important parameters of this function.
itemCount: Pass the number of items on the list to the property itemCount.
itemBuilder: Implement the itemBuilder function to create the layout for each item of the list. We can use this to create the layout for the individual items of the list. We have to return the widget representing the layout of an individual item of the list from this function. This function is called by the framework and an instance of the BuildContext and an index corresponding to an item of our list will be passed to it. This will be called itemCount times and the index passed to it is greater than or equal to 0 and less than itemCount. So let’s return a Text widget and pass a string of our list by index while creating an instance of the Text widget. Now save this and load the long list widget by tapping on the corresponding item of the list on the home page. Now we can see the list of 20 strings, each of the items has the corresponding index printed. So here we have indexes from 0 to 19.
....
body: ListView.builder(
    itemCount: listOfItems.length,
    itemBuilder: (BuildContext context,int index){
  return Text(listOfItems[index]);
}),
...
Now you can create a custom layout for the list items by composing different widgets and returning this itemBuilder function. Let me display two lines of text for each item.
– Wrap this Text by a Column
– Add another Text widget to the list of children of the Column
– Pass CrossAxisAlignment.start to the property crossAxisAlignment of the Column
– Wrap the Column with a Padding widget to add some space around it.
– We can also wrap this whole thing with a GestureDetector and implement the onTap callback function to make the items clickable.
...
body: ListView.builder(
    scrollDirection: Axis.vertical,
    itemCount: listOfItems.length,
    itemBuilder: (BuildContext context,int index){
  return GestureDetector(
    onTap: (){
      print('Tapped on item #$index');
    },
    child: Padding(
      padding: const EdgeInsets.all(8.0),
      child: Column(
        crossAxisAlignment: CrossAxisAlignment.start,
        children: [
          Text(listOfItems[index]),
          Text('Sample subtitle for item $index'),
        ],
      ),
    ),
  );
}),
...
Now save the changes and load the long list by clicking the second item of the list on the home page.
import 'package:flutter/material.dart';
class LongList extends StatelessWidget {
  List listOfItems=List.generate(20, (index) => 'Sample Item - $index');
  LongList({Key? key}) : super(key: key);

  @override
  Widget build(BuildContext context) {

    return Scaffold(
      appBar: AppBar(),
      body: ListView.builder(
          itemCount: listOfItems.length,
          itemBuilder: (BuildContext context,int index){
        return GestureDetector(
          onTap: (){
            print('Tapped on item #$index');
          },
          child: Padding(
            padding: const EdgeInsets.all(8.0),
            child: Column(
              crossAxisAlignment: CrossAxisAlignment.start,
              children: [
                Text(listOfItems[index]),
                Text('Sample subtitle for item $index'),
              ],
            ),
          ),
        );
      }),
    );
  }
}
Now our list items look a little better with the new layout, but there is a better way to achieve this. Flutter provides a widget called ListTile to easily create a common type of layout for list items. I shall show you how to use ListTile, but before that let’s make this list horizontal, and let’s also try creating a list with separators or dividers in between the items.
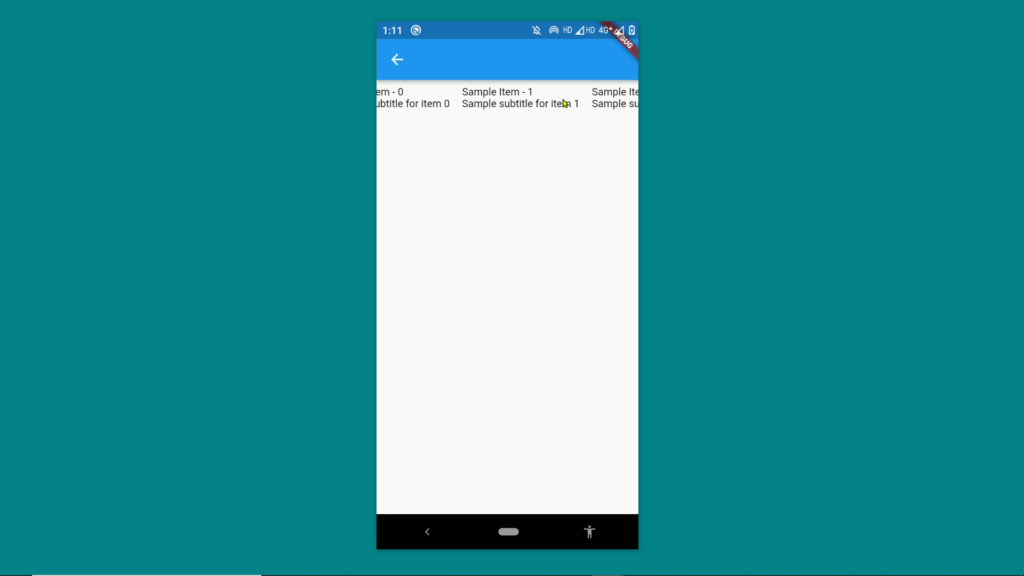
5. Horizontal list: Create a horizontal list. Making a list horizontal is extremely easy. We have to use the property called scrollDirection of the ListView. Pass Axis.horizontal to scrollDirection .
body: ListView.builder(
    scrollDirection: Axis.horizontal,
    ...
)
Save the changes. Notice that our list is horizontal now.
6. List with separators: Now let’s create a list with separators between items. This will be almost the same as what we have done here in this file long_list.dart, so I’ll simply copy the file long_list.dart and paste it once inside the lib folder. Let’s call this new file long_list_with_separator.dart.
Rename the widget to LongListWithSeparator: Right click on the name -> click on Refactor-> then Rename [or hit Shift+f6], and type the new name.
import 'package:flutter/material.dart';
class LongListWithSeparator extends StatelessWidget {
  List listOfItems=List.generate(20, (index) => 'Sample Item - $index');
  LongListWithSeparator({Key? key}) : super(key: key);
  @override
  Widget build(BuildContext context) {
   }
}
This time inside the builder function while adding the ListView to the body of the Scaffold, create the instance of the ListView widget using the constructor named separated() instead of builder().
Now you’ll immediately notice an error here saying- “The named parameter ‘separatorBuilder’ is required, but there’s no corresponding argument.”. While creating a ListView with the constructor separated we must provide value for property called separatorBuilder, and this separatorBuilder is a callback function similar to itemBuilder. The syntax is the same as the itemBuilder function, it should have two parameters :
– first is a BuildContext
– and the second is the index.
And we have to return a widget that we want to appear in between two items of the list. We shall display a thin horizontal line between the items of the list. And Flutter provides a widget for that too, called Divider(). Let’s return an instance of the Divider widget from this separatorBuilder function. You can customize the look of this divider by providing values for the different relevant fields of the widget, but here I’ll keep it simple, as it is.
body: ListView.separated(
    itemCount: listOfItems.length,
    itemBuilder: (BuildContext context,int index){
  return GestureDetector(
    onTap: (){
      print('Tapped on item #$index');
    },
    child: Padding(
      padding: const EdgeInsets.all(8.0),
      child: Column(
        crossAxisAlignment: CrossAxisAlignment.start,
        children: [
          Text(listOfItems[index]),
          Text('Sample subtitle for item $index'),
        ],
      ),
    ),
  );
}, separatorBuilder: (BuildContext context, int index) {
      return const Divider();
}, ),
Load this widget on clicking the second item of the list on the home page.
The last thing we have to do before we can view this list is to load it onclicking an the third item of the list of the home page. So open the file simple_list.dart.
Inside this onTap function of the GestureDetector of the third item of the list, write the code to load the widget LongListWithSeparator with help of the Navigator. Let’s copy the code from the second item and change the widget being returned to LongListWithSeparator().
...
GestureDetector(
  onTap: (){
    Navigator.of(context).push(MaterialPageRoute(builder: (BuildContext context)=>LongListWithSeparator()));
  },
  child: const Padding(
    padding: EdgeInsets.all(8.0),
    child: Text('Tap to view a long list with separators'),
  ),
),
...
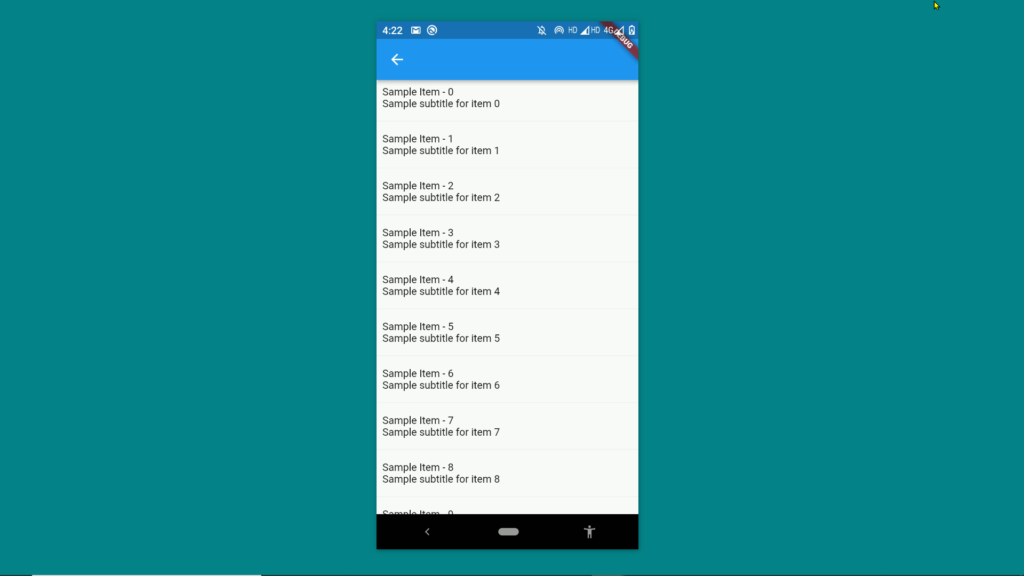
Now run the app and tap on the third item of the list on the home page. And we have the list with a thin horizontal line separating the items of the list from each other.
7. ListTile: Use the ListTile widget to create the layout for the individual items of the list.
Now let me show you how to create the layout for an individual item of the list using the ListTile widget.
– And this too is pretty simple. Simply return an instance of the class ListTile.
– Pass a Text widget to the property title for the main text of the item. Pass the corresponding string from our listOfItems.
– Pass another Text widget to the property subtitle to display a text below the main text. Save the changes, and it already looks similar to what we had.
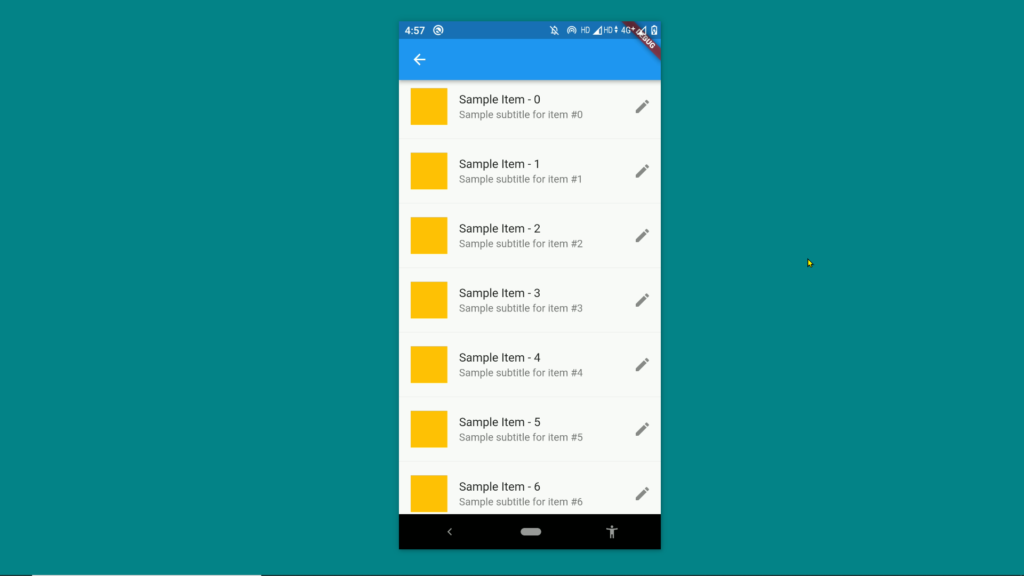
– There is another cool property named leading, it takes a widget and places it at the start of the horizontal axis. It is often required to display images or icons at the start, and doing this is pretty easy with ListTile. Let’s pass a Container to the property, add a height and a width of 50, and a color. Let’s pass a color from the Colors class. Save and notice the changes. Now we often need to display some icons towards the end of a list item, for example an icon indicating more actions. For that too we have a property called trailing in the ListTile widget.
– We can pass any widget to these properties, now here to trailing let’s pass an instance of the widget Icon. While creating the instance of Icon pass an Icon from the Icons class.
– Let’s pass Icons.edit. Now save and we have a trailing icon for each item on the list.
– And last but not least we no longer need the GestureDetector to make the list items clickable, ListTile has a property called onTap for callback function, that gets executed on taping the ListTile.
...
body: ListView.separated(
    itemCount: listOfItems.length,
    itemBuilder: (BuildContext context,int index){
  return ListTile(
    onTap: (){
              print('Clicked on item #$index'); // Print to console
     },
    title: Text(listOfItems[index]),
    subtitle: Text('Sample subtitle for item #$index'),
    leading: Container(
      height: 50,
      width: 50,
      color: Colors.amber,
    ),
    trailing: Icon(Icons.edit),
  );
}, separatorBuilder: (BuildContext context, int index) {
      return const Divider();
}, ),
...
Save the changes and now we have a list of items with beautiful layouts.
What have we learned?:
What is next?:
Complete code: