Intro: We shall allow the user to post an ad for a product that he or she wants to sell. In this lesson, we shall create a form to add a title of the product, a short description, a long description, the product price, and an image. Once the user submits the form the product ad will be added to the database and will be available on the product list immediately. In this lesson, we shall create only the UI, the view, and we shall implement the database interaction later.
Steps:
Step 1: First of all, create a new file inside the views directory, name it sell.bade.php.
Step 2: Also add a route for this view, on the web.php file inside the routes folder. Route::get('/sell',function(){ return view('sell'); });
Step 3: Now we can load this page by entering ‘HTTP://bns.go/sell’. The page is blank now, so let’s start adding content to it.
Step 4: Add the tags for the base layout component inside the view <x-base-layout> </x-base-layout>
Step 5: Add a <form > element
Step 6: Add an input field for a product title, also add a label.
<x-base-layout>
    <form method="POST" action="">
      <label for="title">Product title</label>
      <input id="title" type="text" >
    </form>
</x-base-layout>
Step 7: Now add some styles to make it look better. We can add the Tailwindcss classes here itself or we can create reusable components the way Laravel Breeze has created for the components of the Login screen and the registration screen. Take a look at the components folder, you’ll notice components like auth-card, input, label, button, etc – these are added by Laravel Breeze and used in the authentication-related screens.
Step 8: Let’s make a component similar to the auth-card component. We shall create an anonymous component, so no need to run the make:component command. Simply create a new file with .blade.php extension inside the components folder, let’s name it form-container-card.blade.php. We shall make the form look similar to the login and registration forms, so lets copy the content of the auth-card component. We shall make two changes here-
a. First, let’s change the background color to bg-gray-50 on the root div as this is the color we are using on the products list and product details pages.
b. Secondly, rename the variable $logo to $title, as instead of the logo as shown on the login screen .we shall display a title like “What do you want to sell today?”. Also, make the title a little bold using the class font-semibold.
<div class="min-h-screen flex flex-col sm:justify-center items-center pt-6 sm:pt-0 bg-gray-50">
    <div class="font-semibold">
        {{ $title }}
    </div>

    <div class="w-full sm:max-w-md mt-6 px-6 py-4 bg-white shadow-md overflow-hidden sm:rounded-lg">
        {{ $slot }}
    </div>
</div>
Step 9: Now inside the file sell.blade.php, wrap the form inside the tags <x-form-container-card>.
<x-base-layout>
  <x-form-container-card>
      <form method="POST" action="">
        <label for="title">Product title</label>
        <input id="title" type="text" >
      </form>
  </x-form-container-card>
</x-base-layout>
If you reload the page now, you’ll get an error as we have not defined the slot title. So inside the <x-form-container-card> tag lets add the <x-slot> tags , pass title to the attribute name and add the text to display inside these tags.
<x-base-layout>
  <x-form-container-card>
    <x-slot name="title">
      What do you want to sell today?
    </x-slot>

      <form method="POST" action="">
        <label for="title">Product title</label>
        <input id="title" type="text" >
      </form>
  </x-form-container-card>
</x-base-layout>
Now reload the page ,
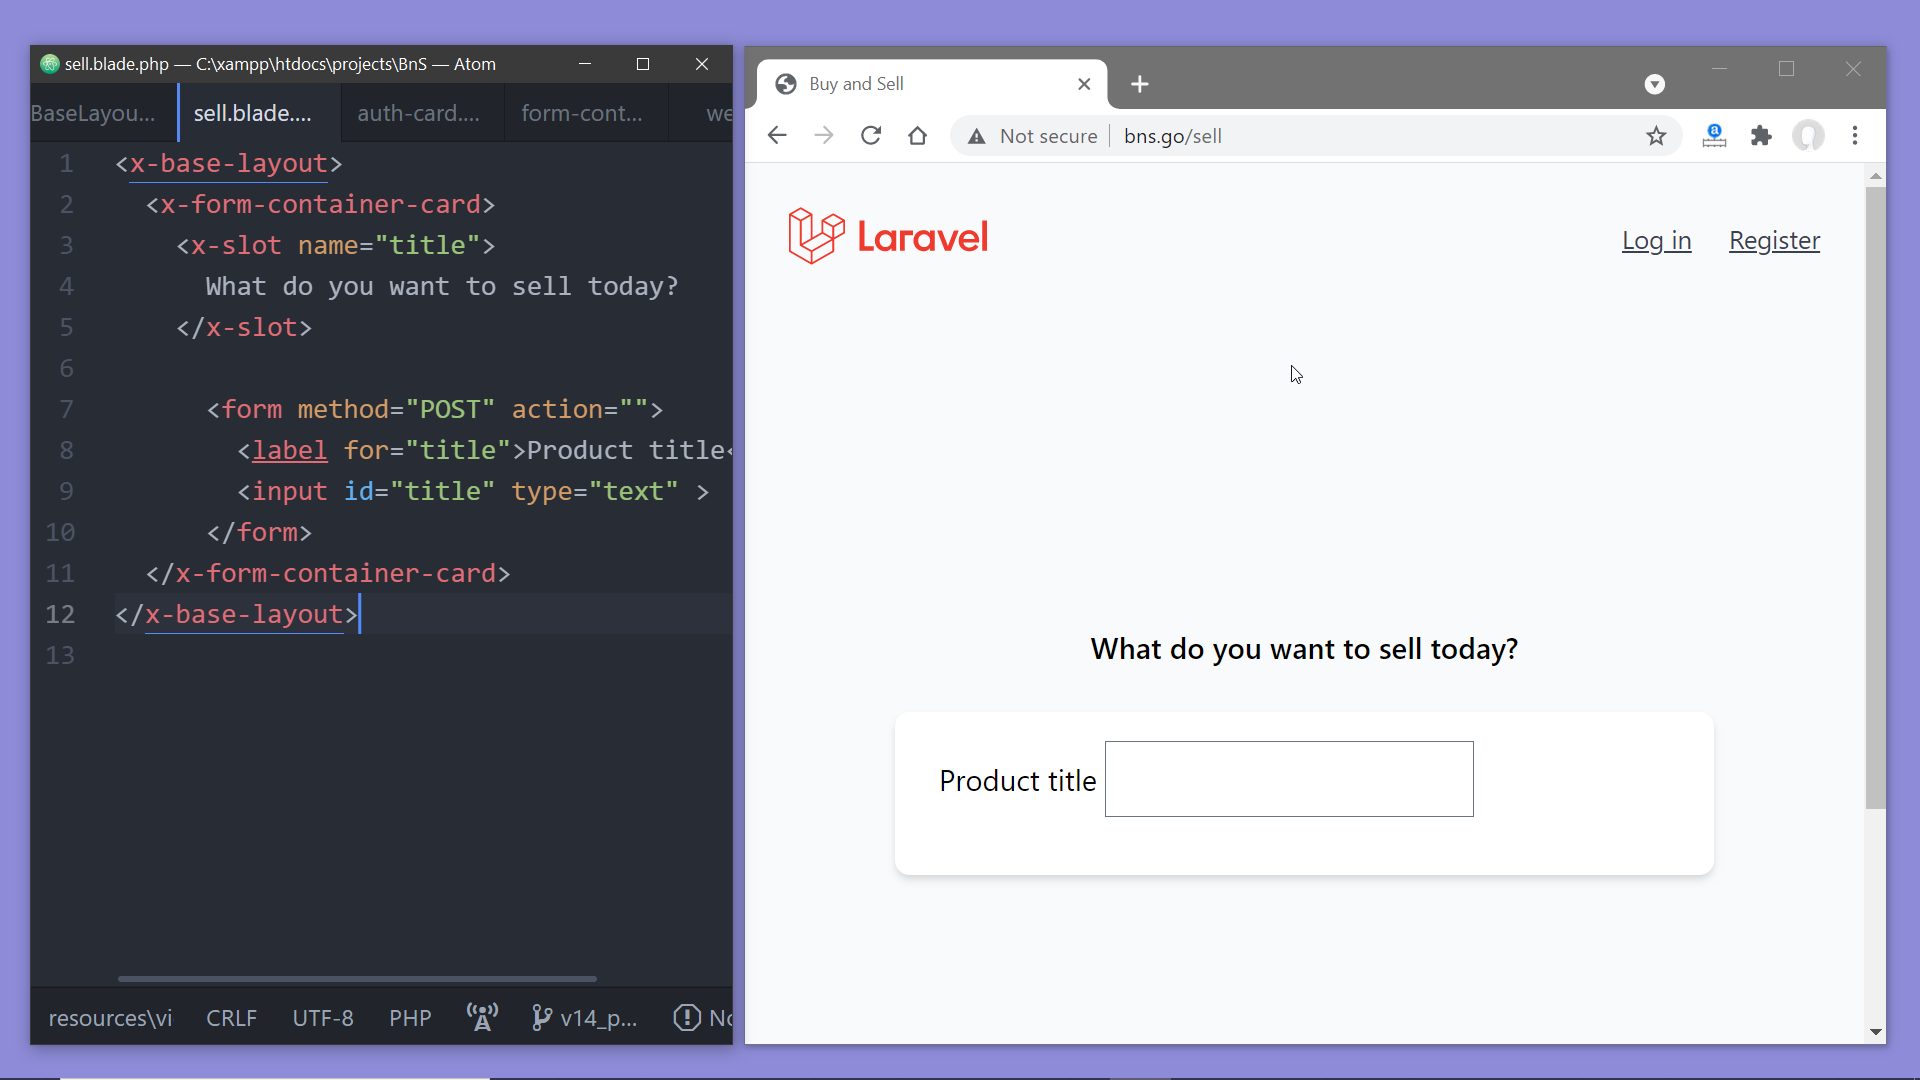
…and we can see the changes.
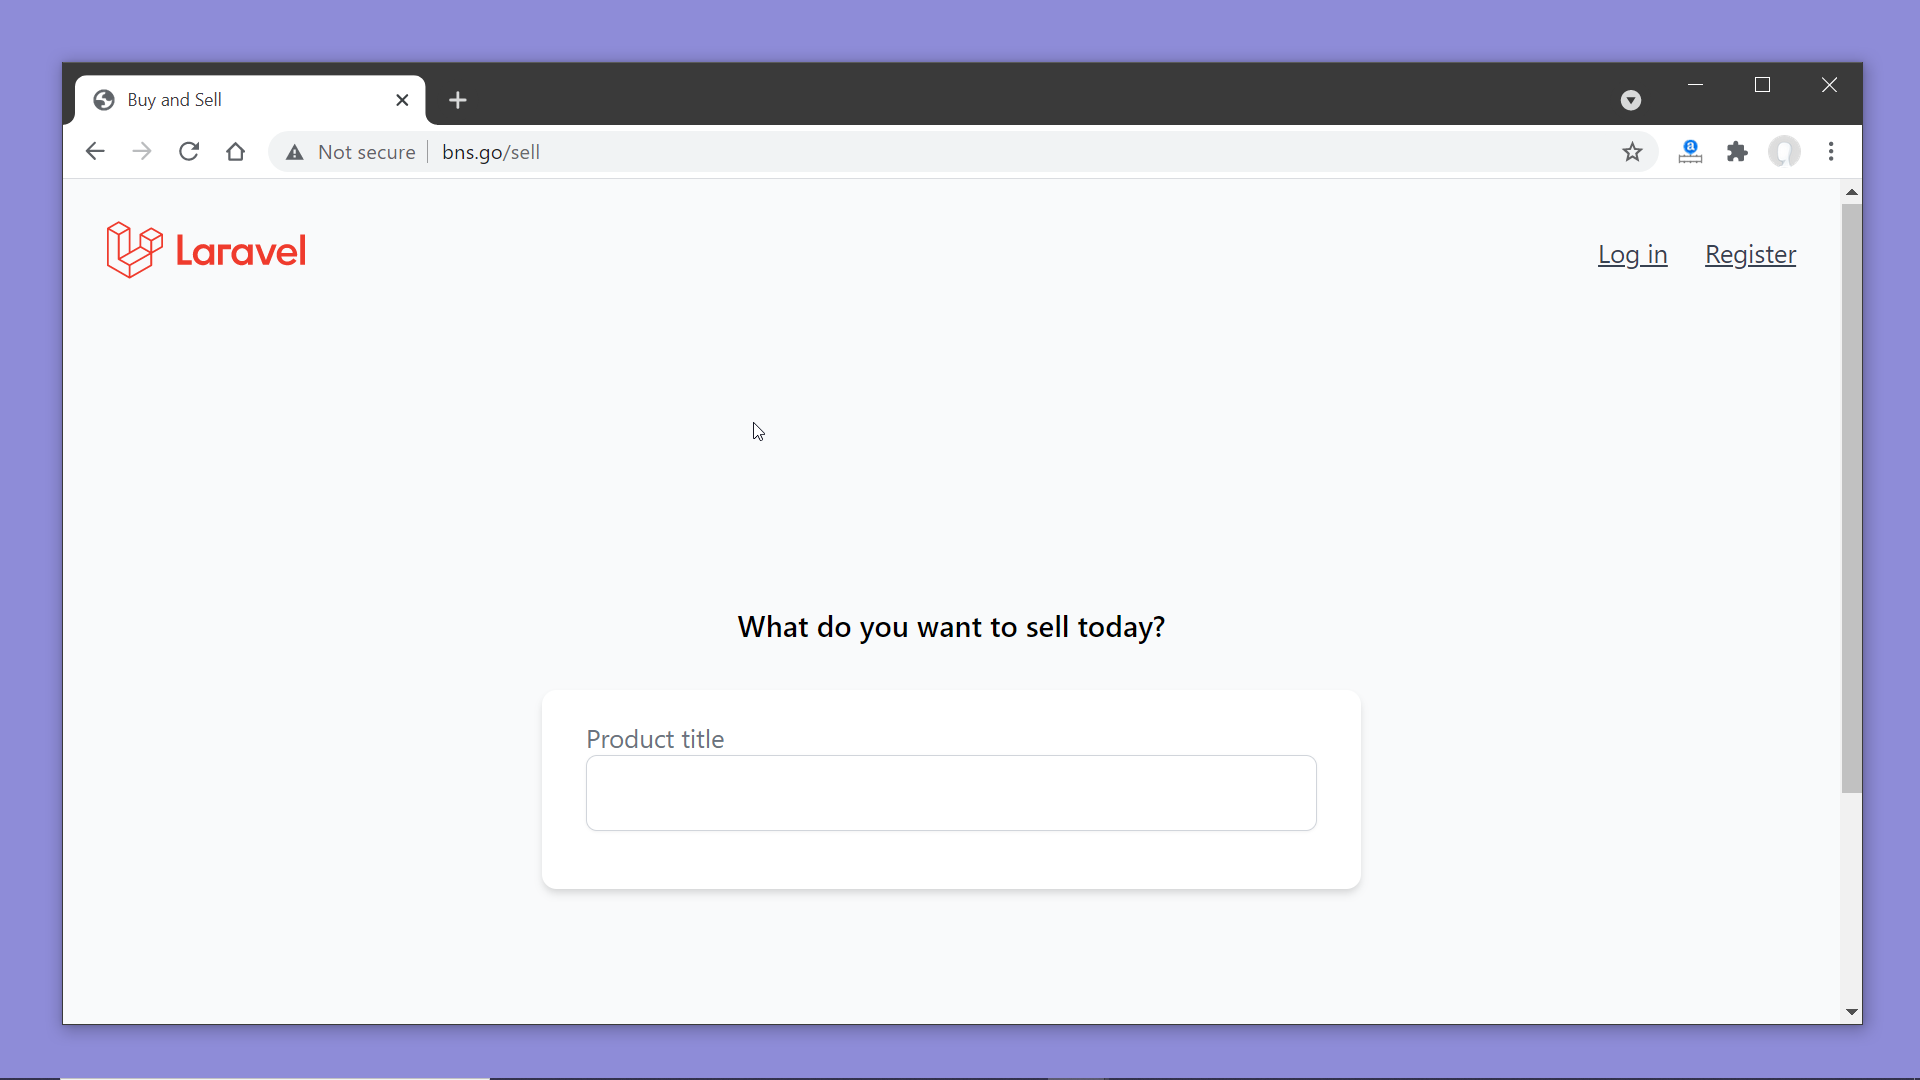
Step 10: We also have to make the input box and the label look better. For that let’s add the classes text-sm and text-gray-500 to the label to make it look a little smaller and gray. And to the input element lets add- rounded-md to make the corners round, shadow-sm to add some shadow, border-gray-300 to add a gray border, **** focus:border-indigo-300 to make the border color indigo when focused and w-full to let it occupy the maximum space available horizontally inside the container.
Let’s group the label and the input element inside a div and add a top margin to the div (mt-2).
<x-base-layout>
  <x-form-container-card>
    <x-slot name="title">
      What do you want to sell today?
    </x-slot>

      <form method="POST" action="">
        <label for="title" class="text-sm text-gray-500">Product title</label>
        <input id="title" type="text" class="rounded-md shadow-sm border-gray-300 focus:border-indigo-300 w-full">
      </form>
  </x-form-container-card>
</x-base-layout>
And now it looks like this,
Now we shall create the input fields for the other fields too.
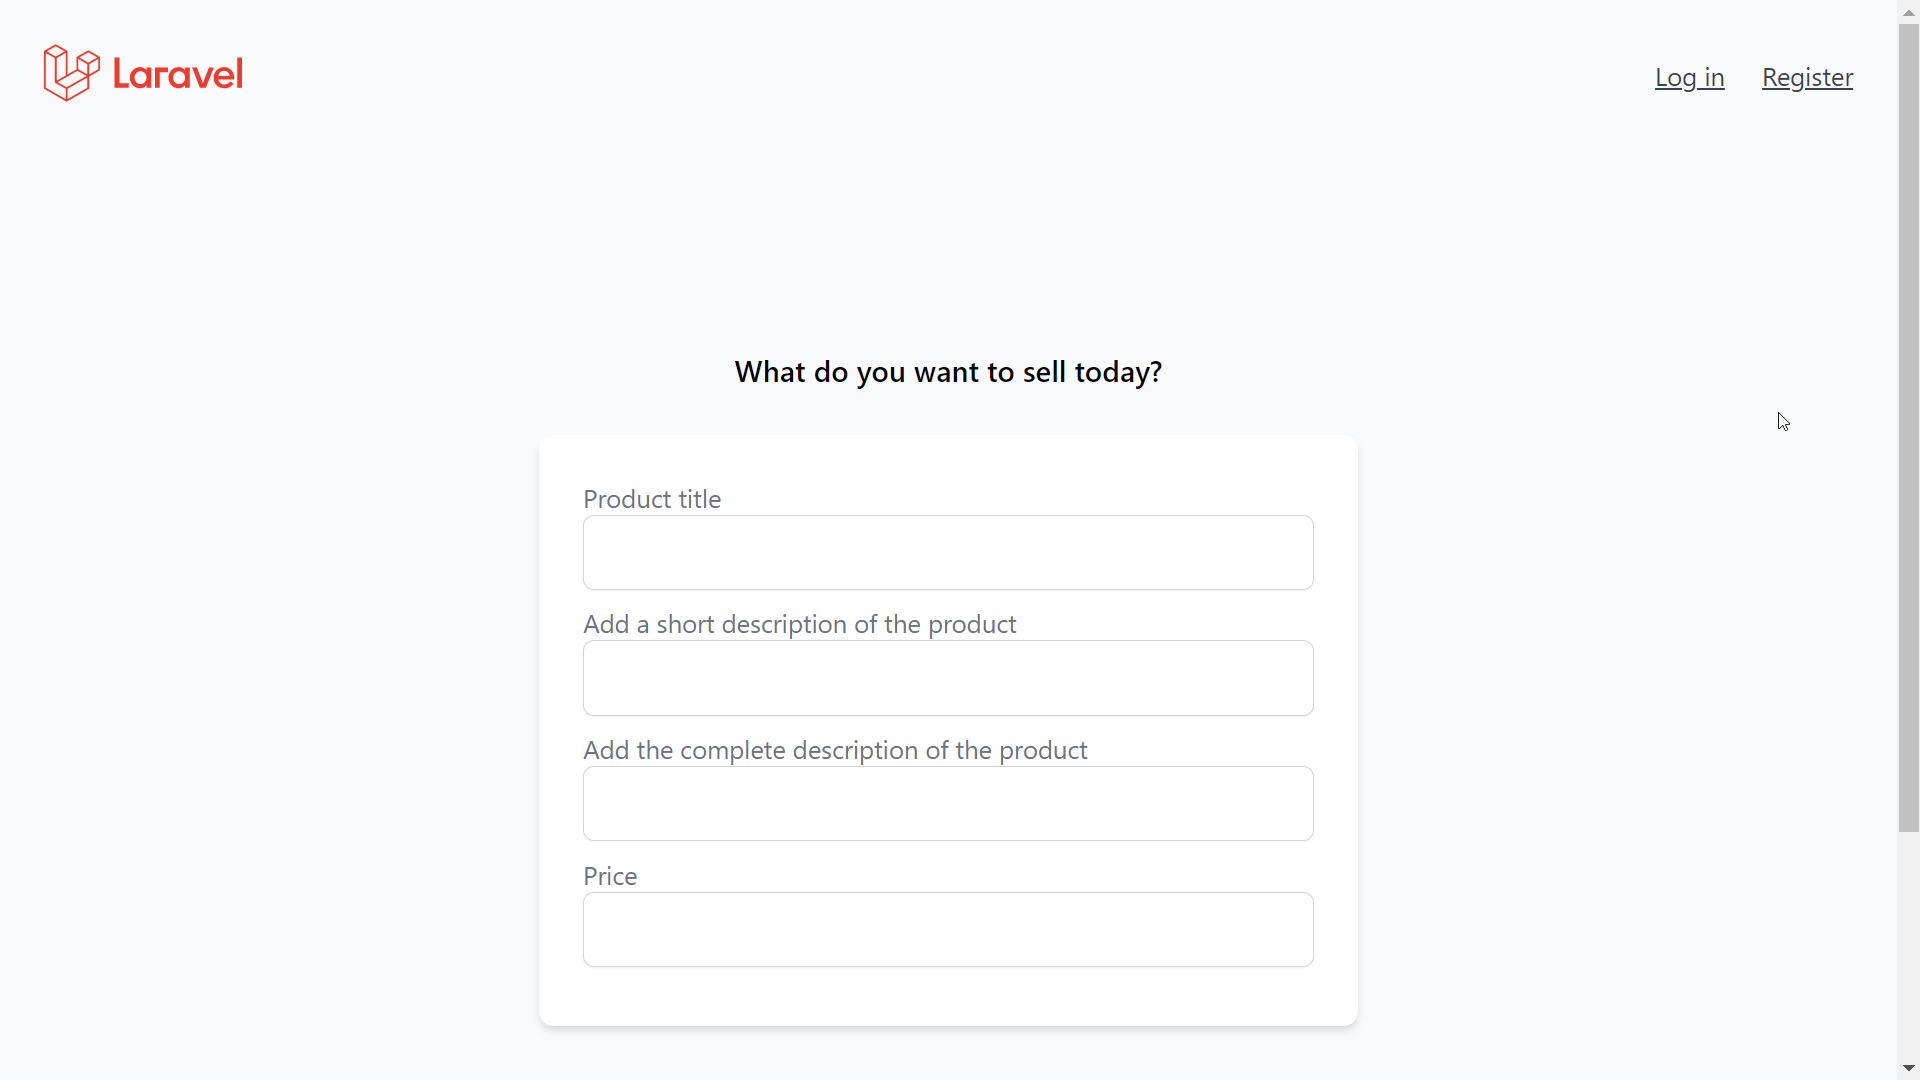
Step 11: Let’s copy and paste these elements three times for the small description, the long description and the price of the product.
<x-base-layout>
  <x-form-container-card>
    <x-slot name="title">
      What do you want to sell today?
    </x-slot>

      <form method="POST" action="">
        <div class="mt-2">
          <label for="title" class="text-sm text-gray-500">Product title</label>
          <input id="title" type="text" class="rounded-md shadow-sm border-gray-300 focus:border-indigo-300 w-full">
        </div>
        <div class="mt-2">
          <label for="desc-sm" class="text-sm text-gray-500">Add a short description of the product</label>
          <input id="desc-sm" type="text" class="rounded-md shadow-sm border-gray-300 focus:border-indigo-300 w-full">
        </div>
        <div class="mt-2">
          <label for="desc-full" class="text-sm text-gray-500">Add the complete description of the product</label>
          <input id="desc-full" type="text" class="rounded-md shadow-sm border-gray-300 focus:border-indigo-300 w-full">
        </div>
        <div class="mt-2">
          <label for="price" class="text-sm text-gray-500">Price</label>
          <input id="price" type="text" class="rounded-md shadow-sm border-gray-300 focus:border-indigo-300 w-full">
        </div>
      </form>
  </x-form-container-card>
</x-base-layout>
And the page looks like this—
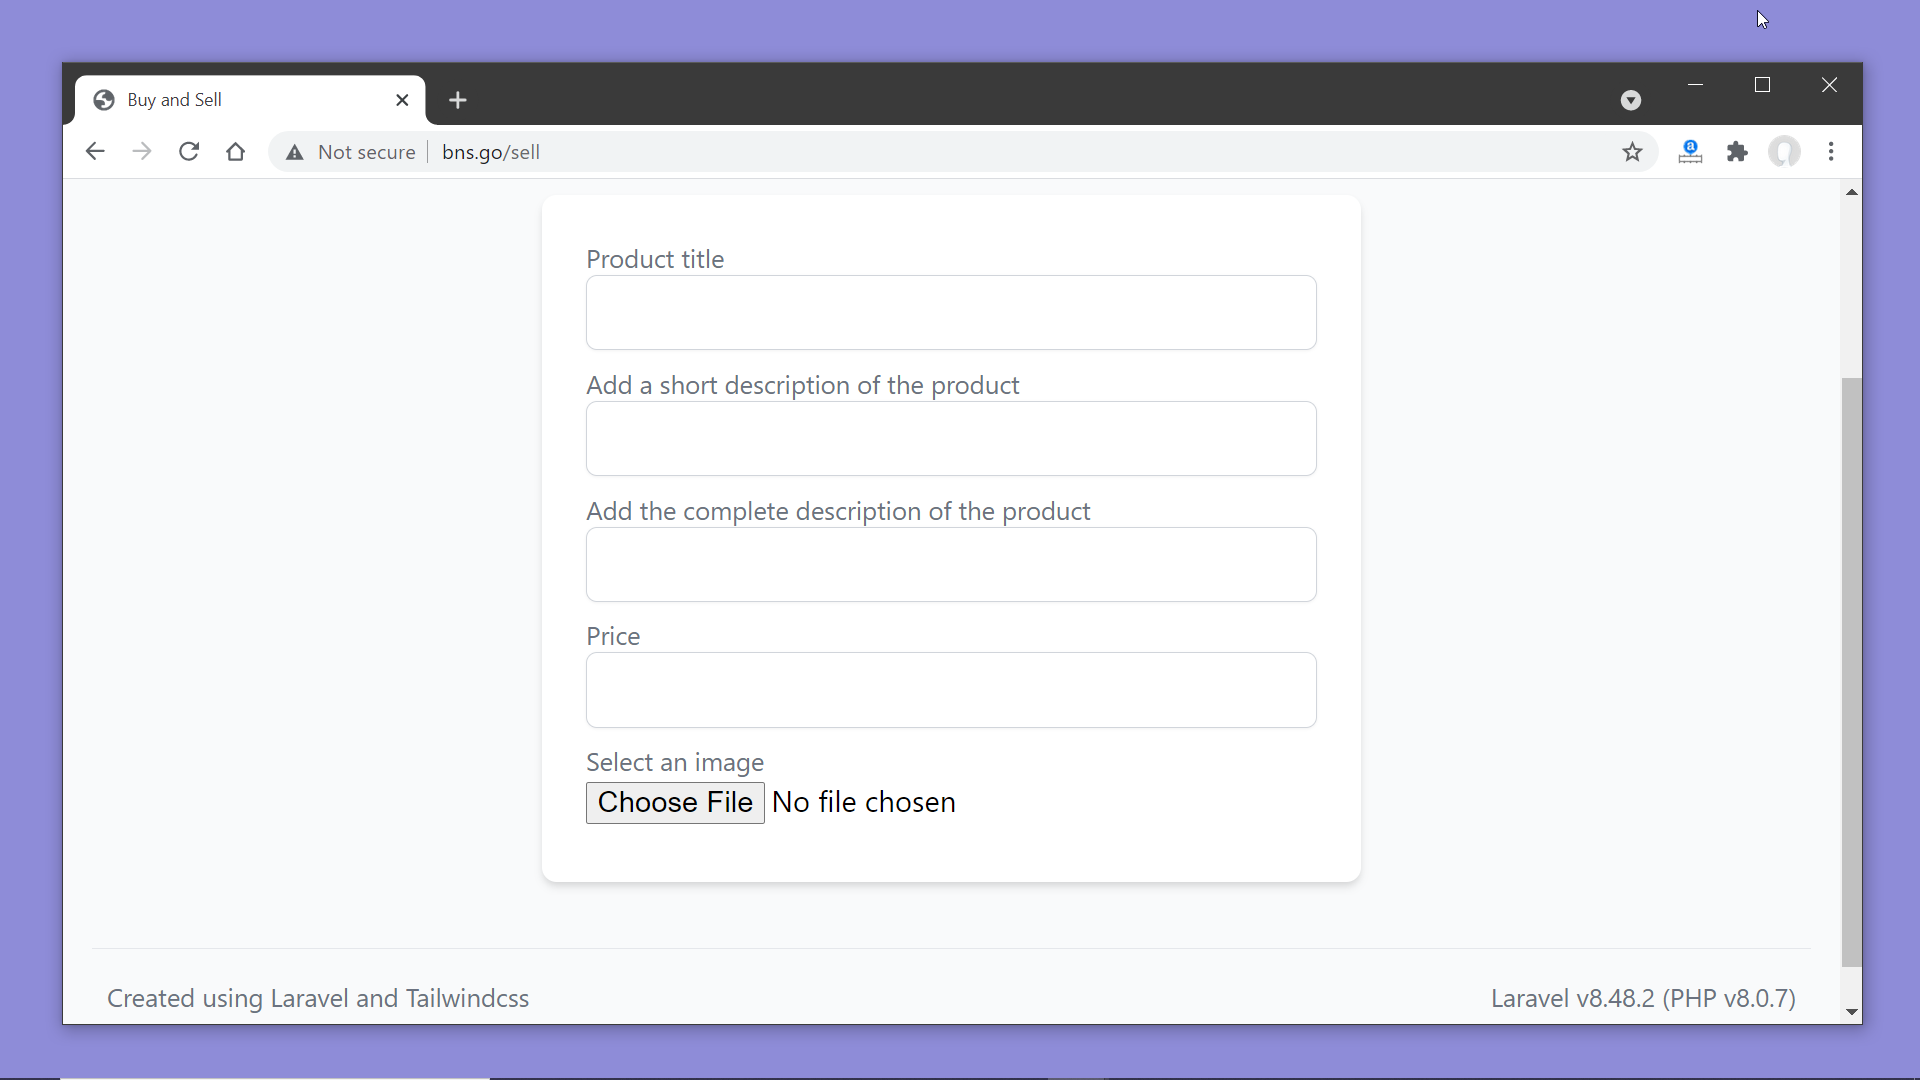
Step 12: We are also going to allow the user to upload an image of the product for the ad, so let’s add a label and an <input> element with type=file , to allow the user to pick a file from the computer. On this input element we shall keep only w-full in the class list.
<x-base-layout>
  <x-form-container-card>
    <x-slot name="title">
      What do you want to sell today?
    </x-slot>

      <form method="POST" action="">
        <div class="mt-2">
          <label for="title" class="text-sm text-gray-500">Product title</label>
          <input id="title" type="text" class="rounded-md shadow-sm border-gray-300 focus:border-indigo-300 w-full">
        </div>
        <div class="mt-2">
          <label for="desc-sm" class="text-sm text-gray-500">Add a short description of the product</label>
          <input id="desc-sm" type="text" class="rounded-md shadow-sm border-gray-300 focus:border-indigo-300 w-full">
        </div>
        <div class="mt-2">
          <label for="desc-full" class="text-sm text-gray-500">Add the complete description of the product</label>
          <input id="desc-full" type="text" class="rounded-md shadow-sm border-gray-300 focus:border-indigo-300 w-full">
        </div>
        <div class="mt-2">
          <label for="price" class="text-sm text-gray-500">Price</label>
          <input id="price" type="text" class="rounded-md shadow-sm border-gray-300 focus:border-indigo-300 w-full">
        </div>

        <div class="mt-2">
          <label for="img" class="text-sm text-gray-500">Select an image</label>
          <input id="img" type="file" class="w-full">
        </div>

      </form>
  </x-form-container-card>
</x-base-layout>
Now, if we reload the page … we can the button to browse an image.
Step 13: Finally, lets add a button to submit the form. Laravel Breeze has added a component named button for creating a button, which it has used in the login and registration pages. Let us try to use that component for the button here. Let’s add the tags <x-button> </x-button> , and add the text “Post the ad” inside the tags. I will also add some top margin using mt-4, make the button full-width with w-full and align the text inside at the center using justify-center.
<x-base-layout>
  <x-form-container-card>
    <x-slot name="title">
      What do you want to sell today?
    </x-slot>

      <form method="POST" action="">
        <div class="mt-2">
          <label for="title" class="text-sm text-gray-500">Product title</label>
          <input id="title" type="text" class="rounded-md shadow-sm border-gray-300 focus:border-indigo-300 w-full">
        </div>
        <div class="mt-2">
          <label for="desc-sm" class="text-sm text-gray-500">Add a short description of the product</label>
          <input id="desc-sm" type="text" class="rounded-md shadow-sm border-gray-300 focus:border-indigo-300 w-full">
        </div>
        <div class="mt-2">
          <label for="desc-full" class="text-sm text-gray-500">Add the complete description of the product</label>
          <input id="desc-full" type="text" class="rounded-md shadow-sm border-gray-300 focus:border-indigo-300 w-full">
        </div>
        <div class="mt-2">
          <label for="price" class="text-sm text-gray-500">Price</label>
          <input id="price" type="text" class="rounded-md shadow-sm border-gray-300 focus:border-indigo-300 w-full">
        </div>

        <div class="mt-2">
          <label for="img" class="text-sm text-gray-500">Select an image</label>
          <input id="img" type="file" class=" w-full">
        </div>

        <x-button class="mt-4 w-full justify-center">
            Post the ad
        </x-button>

      </form>
  </x-form-container-card>
</x-base-layout>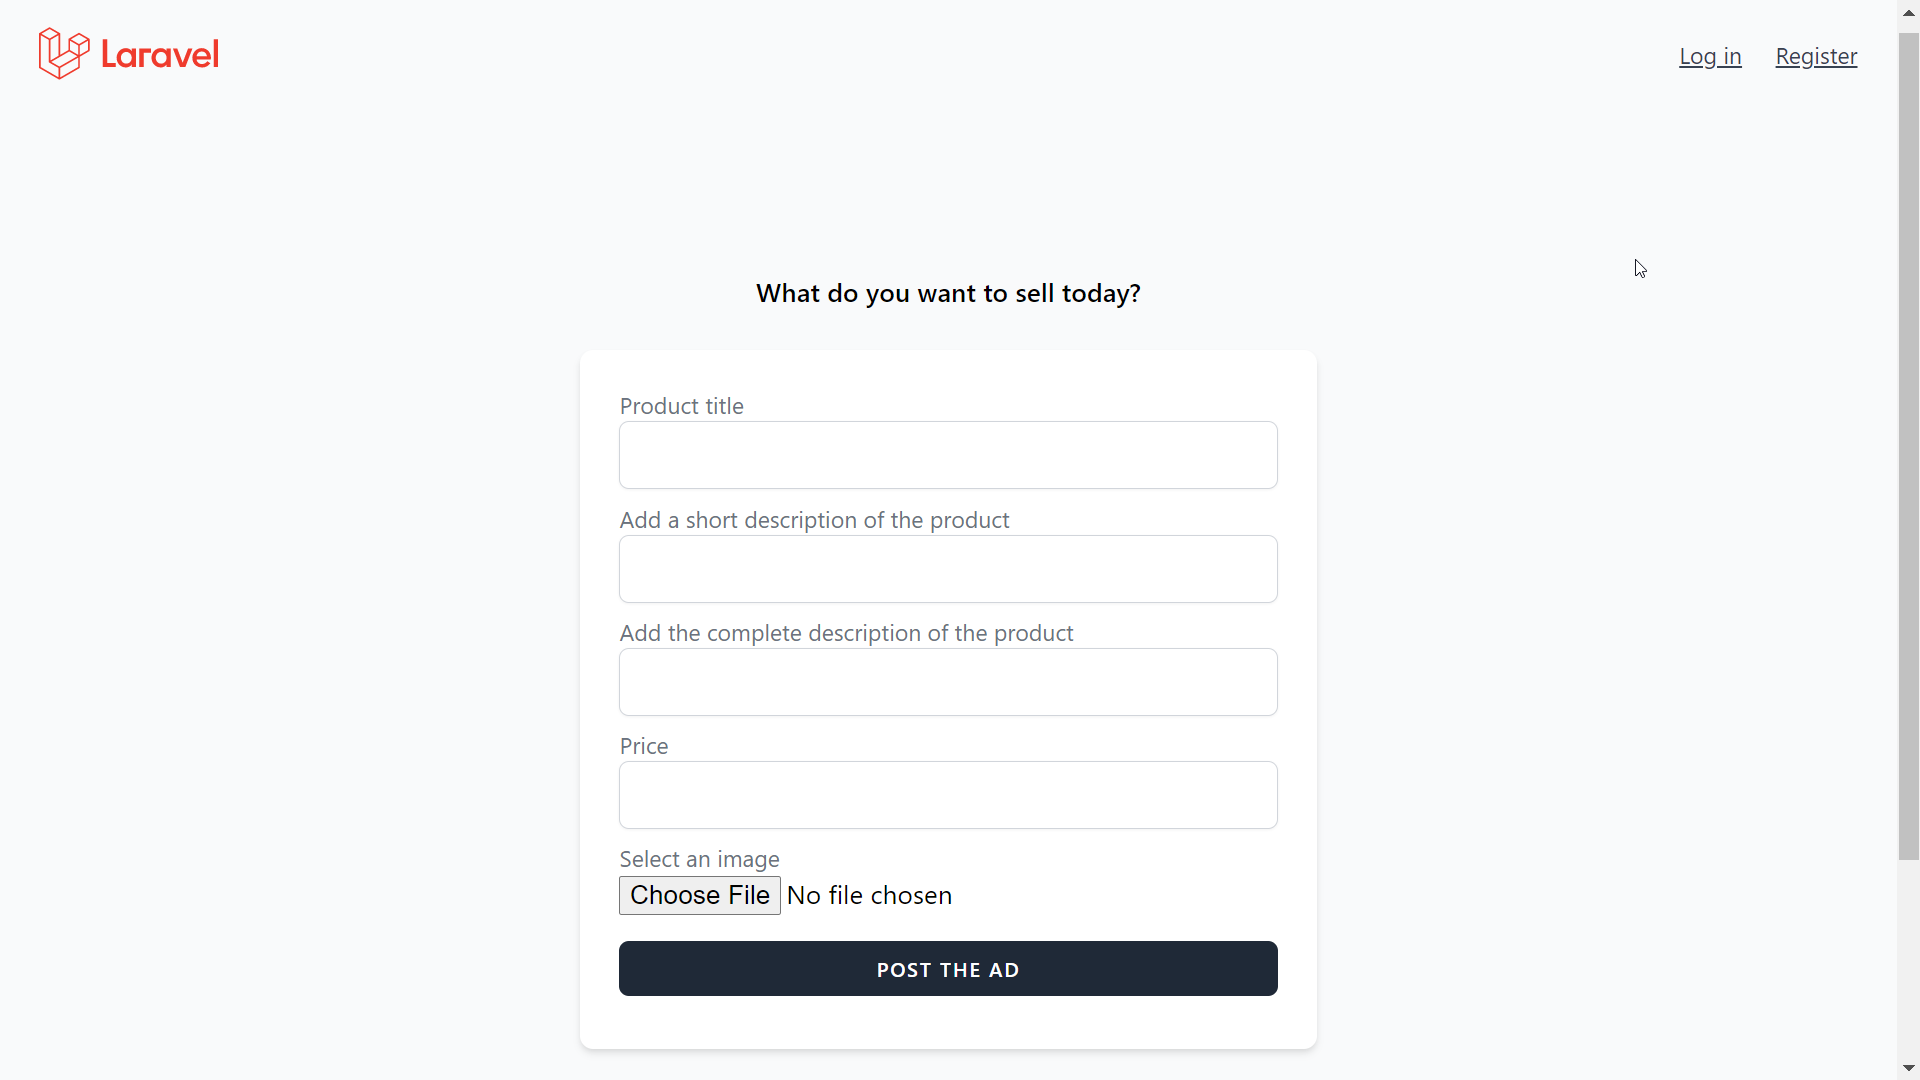
Step 14: The page looks good now, but I would like to make one more change. I will change the third input box to a textarea.
<x-base-layout>
  <x-form-container-card>
    <x-slot name="title">
      What do you want to sell today?
    </x-slot>

      <form method="POST" action="">
        <div class="mt-2">
          <label for="title" class="text-sm text-gray-500">Product title</label>
          <input id="title" type="text" class="rounded-md shadow-sm border-gray-300 focus:border-indigo-300 w-full">
        </div>
        <div class="mt-2">
          <label for="desc-sm" class="text-sm text-gray-500">Add a short description of the product</label>
          <input id="desc-sm" type="text" class="rounded-md shadow-sm border-gray-300 focus:border-indigo-300 w-full">
        </div>
        <div class="mt-2">
          <label for="desc-full" class="text-sm text-gray-500">Add the complete description of the product</label>
          <textarea id="desc-full" class="rounded-md shadow-sm border-gray-300 focus:border-indigo-300 w-full"></textarea>
        </div>
        <div class="mt-2">
          <label for="price" class="text-sm text-gray-500">Price</label>
          <input id="price" type="text" class="rounded-md shadow-sm border-gray-300 focus:border-indigo-300 w-full">
        </div>

        <div class="mt-2">
          <label for="img" class="text-sm text-gray-500">Select an image</label>
          <input id="img" type="file" class=" w-full">
        </div>

        <x-button class="mt-4 w-full justify-center">
            Post the ad
        </x-button>

      </form>
  </x-form-container-card>
</x-base-layout>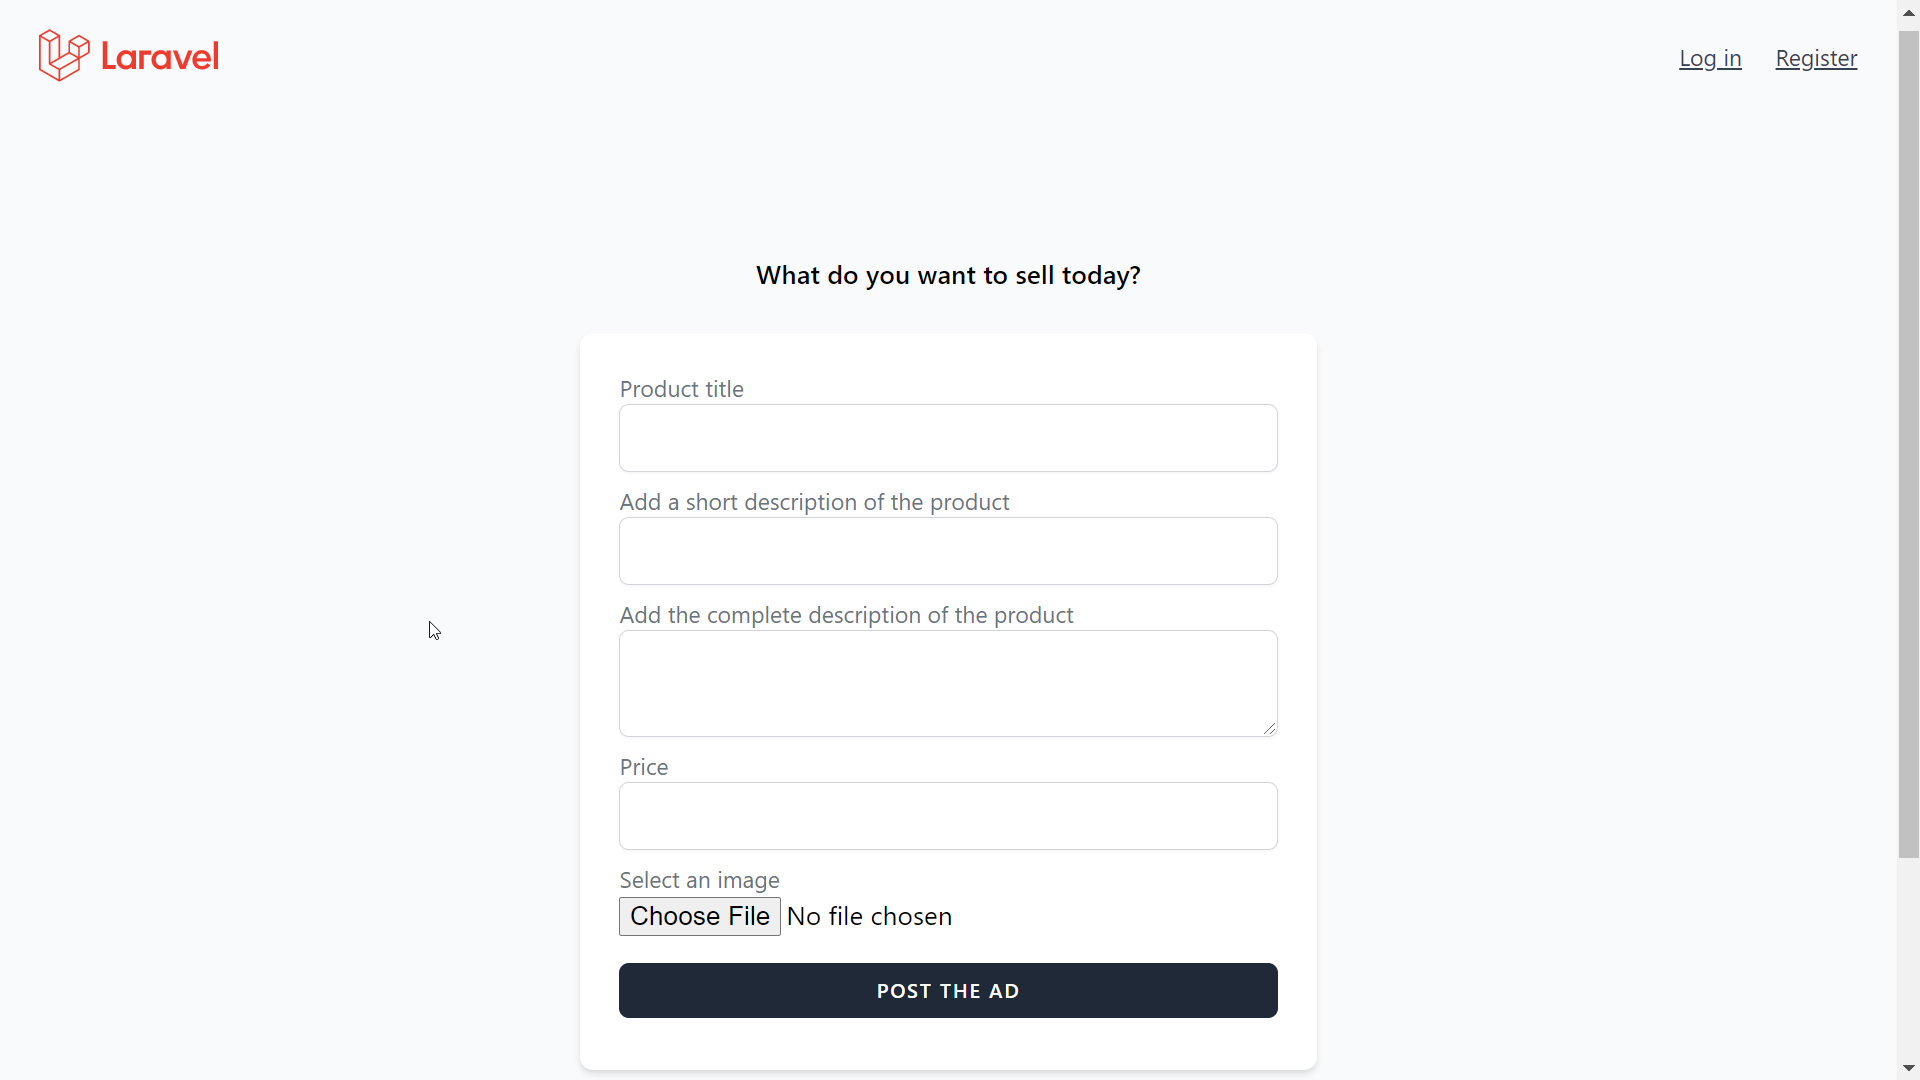
Now it looks perfect…
Step 15: CSRF: HTML forms are vulnerable to CSRF attacks, so what is a CSRF attack? -In simple words, in a CSRF attack, an innocent end-user is tricked by an attacker into submitting a web request that the user did not intend. -Let’s think about a possible attack on our website. An attacker may create and host a web page, where he or she may add the code to submit a product to the same route to which we are going to submit the data of the post-ad form. And while we are logged in to the website if somehow the attacker can get us clicked on a link to her website, we’ll end up posting an ad to sell something that we never intended.
Step 16: To prevent such CSRF attacks CSRF tokens are used inside forms, a CSRF token uniquely identifies the logged-in user. Every time a POST, PUT, PATCH, or DELETE request is made, the CSRF token is verified to confirm that the request has been made by the logged-in user himself, and is not an unauthorized request.
Step 17: Now, Laravel makes the complete process extremely easy for us. To add a CSRF token we simply have to add the Blade directive @csrf . And the process of token verification is done by the middleware named VerifyCsrfToken. (App\Http\Middleware\VerifyCsrfToken)
Step 18: So to secure our form from CSRF attacks we have to add @csrf to the form and that is all.
<x-base-layout>
  <x-form-container-card>
    <x-slot name="title">
      What do you want to sell today?
    </x-slot>

      <form method="POST" action="">
        @csrf
        <div class="mt-2">
          <label for="title" class="text-sm text-gray-500">Product title</label>
          <input id="title" type="text" class="rounded-md shadow-sm border-gray-300 focus:border-indigo-300 w-full">
        </div>
        <div class="mt-2">
          <label for="desc-sm" class="text-sm text-gray-500">Add a short description of the product</label>
          <input id="desc-sm" type="text" class="rounded-md shadow-sm border-gray-300 focus:border-indigo-300 w-full">
        </div>
        <div class="mt-2">
          <label for="desc-full" class="text-sm text-gray-500">Add the complete description of the product</label>
          <textarea id="desc-full" class="rounded-md shadow-sm border-gray-300 focus:border-indigo-300 w-full"></textarea>
        </div>
        <div class="mt-2">
          <label for="price" class="text-sm text-gray-500">Price</label>
          <input id="price" type="text" class="rounded-md shadow-sm border-gray-300 focus:border-indigo-300 w-full">
        </div>

        <div class="mt-2">
          <label for="img" class="text-sm text-gray-500">Select an image</label>
          <input id="img" type="file" class=" w-full">
        </div>

        <x-button class="mt-4 w-full justify-center">
            Post the ad
        </x-button>

      </form>
  </x-form-container-card>
</x-base-layout>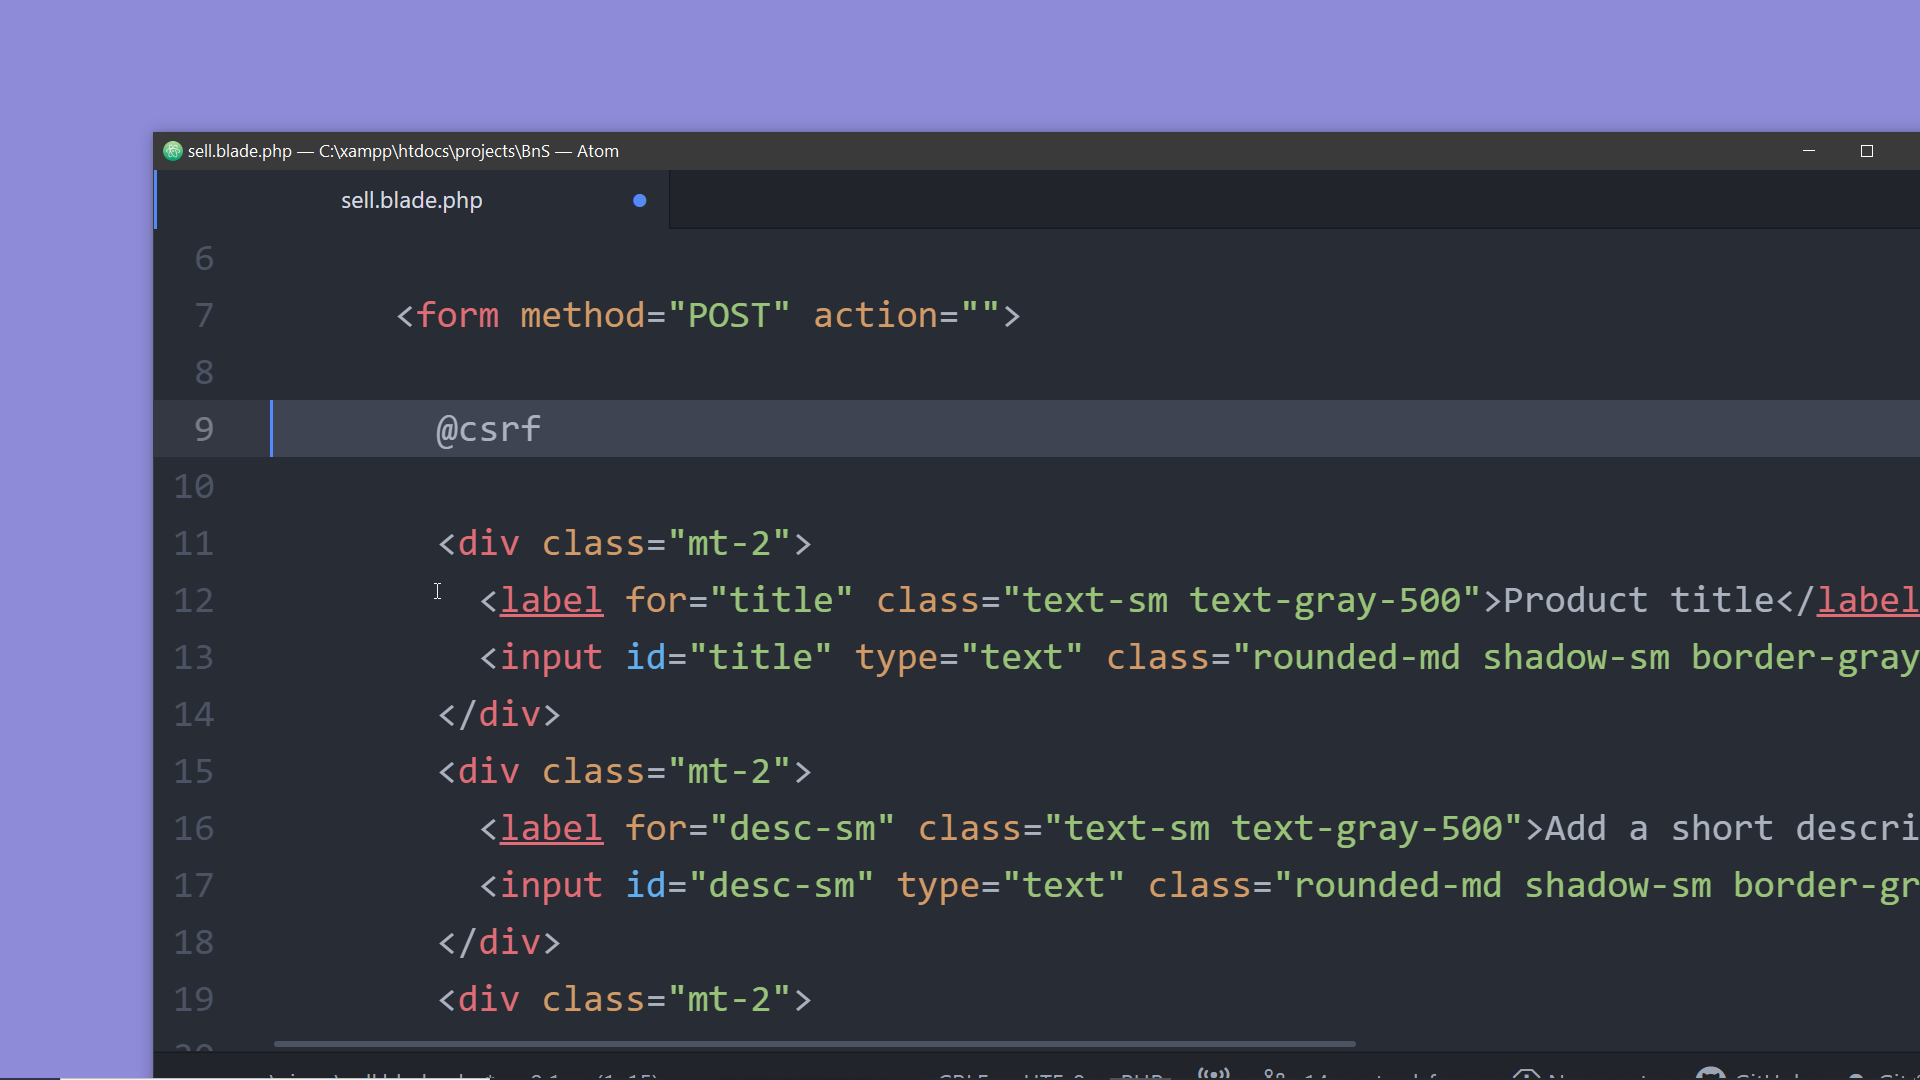
Step 19: To learn more about CSRF attacks, go to the Laravel documentation, click on the menu item The Basics and then take a look at the page CSRF Protection.
Step 20: Finally, let’s add a button on the nav bar to load this page.
Open the component base-layout, and before adding the @auth directive add a link with the text sell , add the route to the sell view to the href attribute. Also add some margin to the right using mr-4.
<div >
            @if (Route::has('login'))
                <div class="">
                        <a href="{{ url('/sell') }}" class="text-sm text-gray-700 underline mr-4">Sell</a>
                    @auth
                        <a href="{{ url('/dashboard') }}" class="text-sm text-gray-700 underline">Dashboard</a>
                    @else
                        <a href="{{ route('login') }}" class="text-sm text-gray-700 underline">Log in</a>

                        @if (Route::has('register'))
                            <a href="{{ route('register') }}" class="ml-4 text-sm text-gray-700 underline">Register</a>
                        @endif
                    @endauth
                </div>
            @endif
          </div>
Now the link to the sell page is visible on the navigation bar .
A better looking image-selection button:
<div class="mt-2">
          <label for="img" class="flex text-sm text-gray-500 cursor-pointer">Select image:
              <svg xmlns="http://www.w3.org/2000/svg" class="h-6 w-6" fill="none" viewBox="0 0 24 24" stroke="currentColor">
  <path stroke-linecap="round" stroke-linejoin="round" stroke-width="2" d="M4 16v1a3 3 0 003 3h10a3 3 0 003-3v-1m-4-8l-4-4m0 0L8 8m4-4v12" />
</svg>
            <input type="file" class="hidden" id="img" name="img" accept="image/*">
          </label>
        </div>